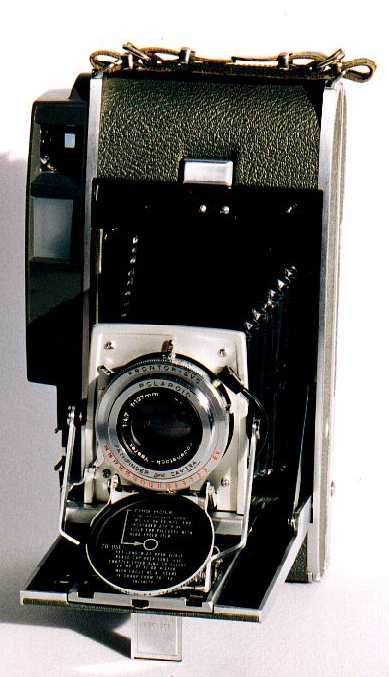
Polaroid 110b Camera
Photo thanks to Mark Hubbard
[email protected]
Related Local Links:
Medium Format Home Page
Medium Format Cameras List Page
Polaroid Cameras Pages
Medium Format Links Pages (see Polaroid..)
Homebrew Medium Format Lenses Pages
Homebrew Cameras pages
Polaroid Lenses Table (below) (Excel
Spreadsheet)
Related Links:
Polaroid User
pages
SX70 Pages
Exposure
Testing with Polaroid Materials (Andrew Davidhazy, RIT)
Improvised
Scanning Digital Camera (Andrew Davidhazy, RIT) using hand scanner
Demo
Quality Scanning Digital Camera (Andrew Davidhazy, RIT)
Phoenix Process
(Andrew Davidhazy, RIT) recycle polaroid negatives in print materials
SX70 Hackers
Guide
Converting Polaroid 110A/B to
Pack film
Polaroid
110A/B Pack Film Conversion Project
Non-Polaroid
Instant Cameras and Films Pages
Packfilm
Camera Pages
Polaroid
Films Tables
Polaroid Links
Pages
Using 120 rollfilm
in Polaroid Series 80/J33 Cameras
We will look here at the many options available for selecting or making a
Polaroid test camera, as well as various specialty films (e.g., type 655
p/n) and resources available. Chances are good that even if there isn't a
Polaroid back available for your model of camera, you can acquire the
benefits of a Polaroid test camera for modest outlays of time, money, and
effort. Read on to find out how!
You have a number of possible approaches to selecting a Polaroid test
camera, depending on your main camera setup. Our first option requires
that your main camera uses interchangeable backs, such as a large format
view camera, a press camera with rollfilm backs, or a medium format system
camera with interchangeable backs. In this case, you can often buy a
Polaroid back which will fit your current camera to make Polaroid test
prints. The big advantage here is that the same lens and lighting setup
that takes the Polaroid test print also takes the final shot on film. So
you have a great test of exposure values, and also of compositional
elements
plus very good insurance about lighting effects and lens coloration factors. With experience and a
Polaroid test shot in hand, you can adjust lighting, eliminate flare and
glare in the studio, and get precisely the exposure and color saturation
factors that you want. That in a nutshell is the benefit of a Polaroid
test shot with system cameras which accept Polaroid film backs (e.g.
Hasselblad, Rollei SLR, Bronica, Mamiya..).
The second option is a standalone Polaroid test camera which accepts your
camera model lenses, for cameras without an interchangeable back option.
The big benefit here is that the same lens that takes the picture is used,
except it is mounted on a Polaroid test camera body and shooting Polaroid
pack film. Examples include the Contax Preview, which is a Contax/Yashica
35mm SLR lens focusing mount on a Polaroid film pack with a reflex
viewer. A somewhat related approach is the Speed Magny for Nikon F/F2 and
the Tekno Polaroid 100 backs for Nikon F2/F3 and Canon F1/F1n. Here a 35mm
SLR body has its back removed and replaced by a Polaroid back, enabling
you to use the 35mm SLR body and lens mount with Polaroid pack film. In
most cases, these Polaroid backs for 35mm SLRs are mounted on dedicated
(or backup) cameras rather than swap the back on and off (as with the
typical interchangeable back medium format camera).
The third option is to get an interchangeable lens camera such as the
Polaroid 600 or 600SE model. This rangefinder camera is related to the
Mamiya Universal press rangefinder cameras, but is dedicated to a Polaroid
back and a limited lineup of three interchangeable lenses (75mm, 127mm,
150mm). In this case, the lens that takes the Polaroid instant photo is
different from the one on your main camera which will take the actual
photo on film. The advantage of an interchangeable lens model is that you
can swap lenses to more closely match the coverage (and hence lighting
effect and composition) of your regular camera lens. So you can use a
moderate wide angle lens such as the 75mm on the Polaroid 600SE to more
closely match the coverage and lighting of say a 50mm wide angle on a Kowa
6 (no interchangeable back 6x6 SLR camera).
The fourth option is a fixed lens Polaroid test camera with a wide range
of shutter and lens aperture settings. This approach is the most popular,
as a fixed lens camera is relatively cheap compared to most
interchangeable lens cameras. By using the same strobe and lighting, you
can get a preview of what the overall lighting effects will be like. In
most cases, you will get an overall exposure and lighting test and a good
indicator of likely color saturation effects (with experience comparing
the instant and final film results). Popular professional cameras in this
fixed lens Polaroid test camera series include the models 110, 110A, 110B,
and more recent 180 and 195 model series. The Konica Instant Press camera
is an interesting bellows camera with adjustable lens that is able to
provide closeups to 1:3 and even 1:1 lifesize with an accessory adapter.
We will look at these popular options in more detail below.
Our fifth option is likely to surprise most readers. You can use low cost
Polaroid cameras ($10-25 US and up) as standalone medium format cameras in
their own right, thanks to an interesting positive/negative film option.
Type 655 (3 1/4" x 3 1/4") p/n black and white film provides both a
black and white print (the positive) and a regular matching negative on a
piece of black and white film. By fixing and washing this negative, you
can make as many black and white enlargements in your darkroom as you
like. So for $10-35 US, you can often pick up a medium format camera which
is capable of making excellent and large medium format images and
enlargements. We will list a number of these camera models in tables
below.
Our sixth option is to make your own Polaroid test camera. This option is
both cheaper and easier than it might appear. You can buy the Polaroid
film pack holder part for a modest fee (e.g., $30-40 US) from any Polaroid
dealer. All you have to do is match the Polaroid back to an existing
camera body. Another approach is to take an existing low cost Polaroid
camera body with integral Polaroid film back, and replace its lens with a
leaf shutter lens with manual settings. Now you have created your own
version of the Polaroid model 110 and related series of cameras.
Our seventh option is to use conventional 35mm Polaroid instant films such
as Polachrome CS in our existing 35mm cameras or medium format cameras
providing 35mm film handling back options (e.g., Mamiya 7II or 6MF,
Bronica..). While this option is not quite so "instant" (at 10 to 30
minutes developing time), it beats waiting on mail processing while in the
African bush. As with type 655 film, you get a permanent image, but this
time you have the option of color as well as black and white slides.
Simply by using a low cost processing kit and these standard 35mm film
cassettes in your regular camera, you can get "instant" slides without
having to invest in a special Polaroid test camera. These slides can
confirm that your regular exposures are "on the money". These instant
slides also ensure that whatever happens to your undeveloped film on the
trip home or in development, you have at least some images "in the bag".
Finally, the new series of low cost digital cameras may offer some options
for use as a test camera, without the cost or messy waste associated with
typical Polaroid instant developing prints and materials. Today's digital
cameras with integral color LCD viewing screen provide relatively low
resolution and small images. But the future suggests that digital backs
and "silicon film" inserts plus a color computer screen may well displace
conventional Polaroid test cameras and materials. At the same time,
we are seeing a trend towards disposable Polaroid cameras and
derivatives of SX-70 film technology (in which there is little
waste paper or materials generated, just a color print).
Now let us look at some of these options and opportunities in more
detail:
Polaroid 600SE lenses include the 75mm f5.6, 127mm f4.7 and 150mm f5.6
optics (plus accessory parallax adjusted viewfinder). The limited three
lens choices, and surprisingly close 150mm "telephoto" lens choice, is a
major weakness for this system against competitors such as the Mamiya
Universal with Polaroid backs. But like the model 110 series, these
600/600SE lenses feature full controls for aperture and shutter speeds,
including apertures down to f/45 or f/64 for use outdoors with faster 100
series films (up to ISO 3000 speeds).
These press style rangefinder
cameras with Polaroid backs are rather heavy, as are the rest of the Mamiya series press cameras. They are also a
bit bulky and hard to fit in standard camera bags, with the projecting
handgrip and high profile rangefinder top. The lens shutter release is
tripped by a dangling cable going to the handgrip. Like the Mamiya
Universal series camera, you have a Polaroid back, a lens with shutter,
and a body to mate the two with a handgrip and coupled rangefinder at the
top. That's the whole camera.
The closest standard medium format camera would be the Mamiya Universal
model, which uniquely takes a standard Polaroid back (versus the Mamiya
Standard and 23 models which oddly don't). If you want the interchangeable
backs of the Mamiya Universal (Graflok, Mamiya) and many lenses (from
50mm to 250mm)
and accessories, then you will pay a bit of a price premium for them.
Other competing rangefinders such as the Koni Omega did not have a
Polaroid back option.
Curiously, only the Mamiya Universal
takes a Polaroid back with a 3 1/4" by 4 1/4" format (!) but requiring use
of special 75mm and 127mm lenses with auxiliary
viewfinders to get this full coverage (standard
lenses will vignette slightly in corners and not cover full 3 1/4" x 4
1/4" format). If
you have a Mamiya RB series camera, you may be able to use the same
Polaroid back on both cameras.
You can use the type 107 black and white film, type 665 for black and
white prints and negative (p/n), and types 669 and 668 for color shots
(e.g., 3 1/4" x 4 1/4" film packs).
Unfortunately, the Polaroid 600 SE camera only focuses to about a yard
(1.1m), so closeups are possible only with closeup diopter lenses and wire framers. On the plus side,
you can switch out different Polaroid film types without losing any shots,
provided you haven't lost the dark slide and have multiple backs
available.
Many of these pre-conversion cameras are being broken up to make the
relatively low cost and high quality Rodenstock or similar leaf shutter
lenses available for budget 4x5" camera
users. Other high quality and good
coverage Polaroid lenses by Kodak (including Kodak
Ektars) and others have also been discovered and recycled as low cost
but high quality optics for various lens conversion projects.
A newer Polaroid model 180 or 195 camera would be a better alternative,
since they take more modern film types and don't require
conversion. Unfortunately, the high quality lenses and relative rarity of
these professional Polaroid cameras makes the price even higher (often
$600 US and up). One advantage of both these cameras is the relatively
small size of the camera when folded up versus other Polaroid test
cameras.
At close distances, the coupled rangefinder is parallax compensated. The
camera can take photos down to 1:3 or 1/3rd lifesize. Beyond that, you
need to consider Polaroid's own MP4 and CU-5 series of closeup and copying
cameras. Naturally, you could also use closeup diopter lenses with a wire frame to show subject
area and the plane of focus. A standard closeup attachment is available
for the Konica Instant Press to take it to life size (1:1) instant
photography.
The problem with doing Polaroid test shots is simply that not all cameras
have provisions for such easy Polaroid film use. Cameras with fixed
non-removable backs are obviously unable to take direct advantage of
Polaroid film materials. Other cameras have to be custom modified to
produce a Polaroid image. For example, the Pentax 67 has a custom Polaroid
back option from a third party manufacturer. Using that Polaroid back on a
Pentax 67 means essentially dedicating a Pentax 67 body to that
purpose. The Nikon F models (F, F2, F3..) have a custom Polaroid
modification using their removable back capabilities. But here too, you
essentially have to dedicate a body to the task, since switching back and
forth while shooting is impractical. At the least, doing so means
finishing up the current roll in the camera to prevent exposure
during swapout. So most professionals dedicate a separate body to
the Polaroid back.
The Nikon model F and F2 35mm SLRs have one Polaroid back option (the
Speed Magny) that provides considerable magnification to a nearly full
Polaroid sized image for the Nikon F and F2 (typically circa $500-700 US
used). The Speed Magny has a mirror and optics that bounce light off the
back and down to a Polaroid film pack underneath the regular 35mm SLR.
Since the small 35mm sized image is being projected onto a full size sheet
of Polaroid film, the image is rather dim (lower effective film speed). If
you are using ASA 3000 Polaroid films, this factor is not an issue, but
may be a problem with some slower film stocks. While you can compensate
with longer exposures, that may ruin your ability to control features like
the degree of softness of running waterfalls and the like where motion is
an important element in the photo.
One interesting difference between the standard Polaroid back approach
often seen in medium format and that of the Nikon 35mm SLR series is
magnification. The Pentax 67 and most medium format cameras provide an
image exactly the same size as that on film. For the Pentax 67, that means
a 6x7cm image on a piece of Polaroid film.
We should say a much bigger
piece of Polaroid film. A good bit of the expensive Polaroid
material is not used in most medium format backs or setups. The Polaroid
film is often much larger than the camera format (e.g., 3 1/4" x 3
1/2" versus 6x7cm). The same is true of my Hasselblad 500 c/cm series
Polaroid back. The image size on Polaroid film is the same as on slide or
print film, namely 6x6cm square (really 56mm x 56mm). So most of the
Polaroid film material area is wasted in this process.
Purists may also want to note that the standard
Polaroid 4x5" film materials are not precisely the same size as
the standard 4x5" sheet of film. On 4x5" pack film holders, you lose
roughly 3mm all around the frame from each edge. But on single sheet
holders, a tab on the bottom of the film pack pushes the film another 3mm
out. The result is an off-center image plus a total of 6mm or 1/4" trimmed
from one side (or the top in a vertical composition). If you are trying to
precisely frame and compose your image to the margins using
Polaroid test shots, these edge loss factors may cause problems.
Today, the main interest in these cameras is as a base for custom wide angle cameras using standard 4x5"
film or rollfilm backs. The four lenses are removed and the body shell and
4x5" back frame are used with a remounted wide angle lens in leaf shutter
carefully machined and mounted in place (e.g., 65mm Super Angulon).
But since these cameras were originally designed
to use Polaroid film backs, homebrew cameras built up from such models
have a direct and easy Polaroid test camera option using the original
Polaroid 4x5" film backs. Similarly, some 6x9cm
mini-view and press cameras have the option
to use Polaroid film packs with an adapter.
A few commercial cameras had a left/right option, where you could expose
only one half of the Polaroid film area for each exposure test.
Unfortunately, you have to process the film when you want to see the
results. So oftentimes, you end up wasting the second half of the film
just to see the desired first test exposure. In the case of some of the
35mm Polaroid film adapters (Tekno models), you can often pull out the
film tab a few inches and take a second exposure on the same film and then
process [for more tips, see Michael Freeman's Instant Film
Photography book]. Given the relatively high cost of Polaroid
materials on a per shot basis, the desire to get the most images out of
each sheet is readily understandable.
One issue that has prevented type 655 p/n from being more popular is the
need to "fix" the negative. In theory, you need to do this shortly after
making and developing the print. The solution used is made of sodium
sulfite (circa 400ml of powder to a gallon or so of water). Nowadays, you
could easily carry a small sealed Tupperware or similar container to
process the negatives in the field. Reportedly, you may be able to get by with just
washing off the gel on the negative if no sodium sulfite solution is
available. However, you should fix the negative within 2-3 minutes of
pulling the negative, or put it in water until you can do so (within 24
hours, 72 hours maximum).
Another minor issue is the cost of batteries for the older pack
cameras. You can buy these directly from Polaroid Corp. for circa $7 US
plus s/h each for many models (e.g., model 250). But others have simply
adapted the cameras for use with more standard batteries (see sites linked
at top of this page, and related
postings). Due to the low cost of these older Polaroid cameras, and
correspondingly low resale or collectible value, it may be cheaper to
adapt them than to buy a series of batteries for a modest volume user.
| model | lens (mm) | f/stop max | shutter | notes | McKeown | |
| 80 | 100 | 8.8 | 1/25-1/100 | $15 | ||
| 80A | 100 | 8.8 | " marked in EV | $15 | ||
| 80B | 100 | 8.8 | see model 80 | $10 | ||
| 95 | 135 | 11 | $25 | |||
| 95A | 130 | 8 | 1/12-1/100 | xsynch | $20 | |
| 95B | 130 | 8 | " marked in EV | $20 | ||
| 100 | 130 | 8 | see model 95A | rollfilm | $20 | |
| 100 auto | 114 | 8.8 | 10 sec-1/1200 | rf, 3 element | $15 | |
| 110 | 127 | 4.5 | 1-1/400 raptar | wollensack, CRF | $60 | |
| 110A | 127 | 4.7 | 1-1/300 prontor | rodenstock/enna-werk lens | $60 | |
| 110B | 127 | 4.7 | " | "� (single window rf) | $70 | |
| 120 | 127 | 4.7 | 1-1/500,b seikosha | yashica mfg | $80 | |
| 150 | 130 | 8 | see model 95B | CRF, parallax | $20 | |
| 160 | 130 | 8 | see 150 | made in Japan | $20 | |
| 180 | 114 | 4.5 | 1-1/500 seiko | Tominon, zeiss-ikon RF | $300 | |
| 190 | 114 | 3.8 | 1-1/500 seiko | zeiss finder ver. Of 195 | $225 | |
| 195 | 114 | 3.8 | 1-1/500 seiko | albada finder | $225 | |
| 700 | 130 | 8 | 1/12-1/100 | xsynch, uncoupled RF (95A) | $20 | |
| 800 | 130 | 8 | see model 95B | CRF, parallax, cf 15 | $20 | |
| 850 | ? | 8.8 | 1/12-1/600 | Elec Eye, to f/82 cd 900 | $20 | |
| 900 | ? | 8.8 | 1/12-1/600 | Elec Eye, to f/82 cd 900 | $15 | |
| sx70 | 116 | 8 | 14 sec to 1/180 | SLR ASA 150 film | $40 | |
| 680 | 116 | 8 | 14 sec to 1/180 | SLR ASA 600 film bigger | ? | |
When you combine
type 655 p/n film with a low cost camera ($25 and up) that is
also autoexposure electronics equipped, you have a lot of medium format
camera for the price of a new filter! The Tominon lenses by Tomioka of
Japan are also highly regarded for their relatively high quality. While
the automatic camera controls are a bit limiting, you can fool them
somewhat (e.g., black tape over camera gives full aperture). Finally, many
of these cameras will work with X-synch strobe flash, according to posters (see also postings section below),
although they were originally designed
for flashbulb use in many cases.
So here is a Polaroid test camera that is also the main camera! The
black and white print is the test, and provides you with a permanent print
for your records. The negative half of the pair provides you with the
option and ability to produce as many darkroom prints as you wish. While
the print resolution on the Polaroid print is typically modest, the
negative permits much higher resolution prints and enlargements to be made
of the exact scene captured in the original print. Cost per print
including the negative runs circa $1 per shot.
| Polaroid Film Pack Cameras - Best Buys Guide |
|---|
|
Good Polaroid pack film cameras are the 100, 230, 240, 250, 340,
350, 360, 440, and 450. All these cameras have glass lenses, coupled
rangefinders and the better exposure system.
Models 100, 240, 250, 350, 260, and 450 have metal bodies and therefore
are more desireable. Models 230, 340, and 440 have plastic bodies with no
tripod socket and are less desireable, but should still work well. Stay
away from other models, such as the 104, 210, 220, 320 and 420.
Note that only the 250, 350, 360, and 450 have Zeiss Ikon viewfinders, but
the Polaroid viewfinders on the other models work as well, just
differently. Note as well that newer pack film cameras like the current
ProPack are actually inferior to the older models.
From a posting courtesy of Diego Hand - Thanks! |
But there is also a well established school of "SX-70 Hacking", wherein
these cameras are adapted to new tasks. The SX-70 is probably the cheapest
recent medium format SLR that you can buy, with prices starting at $20 US
and up for non-collectible models. Some models feature autofocus using
ultrasound sensors, while most have some sort of automatic exposure
capability. Part of the hacking efforts have been to adapt these features
to manual control, thereby enabling uses such as test cameras. Set at f/8
for flash mode photos, the SX-70 provides a useful color film Polaroid
test camera for some users at modest cost. Users adjust flash output power
since the f/stop is used fooled to remain wide open (e.g., f/8 - see related postings and SX-70 pages).
The series 600 films are readily available too, although not exactly
cheap. The SX-70 has some other advantages, including its compact size
when folded (for packing). Certainly, you can win a lot of friends by
passing out some instant developing prints of the subjects themselves. But
since there isn't any negative (as with type 655 p/n B&W films), you can
only make copies by photographing the prints themselves.
So if you have an older Polaroid SX-70 camera hanging about unused and
gathering dust, consider hacking it into something more exotic and useful.
You could have a good bit of fun, and end up with a very low cost Polaroid
SLR test camera (albeit somewhat limited compared to a model 110B
conversion).
This OEM back approach was illustrated in an interesting article by noted
author
and pro photographer Roger Hicks in August 1997 Shutterbug
(p. 38..) titled "Building Your Own Polaroid Test
Camera". Mr. Hicks describes conversion of a Lubitel twin lens reflex
camera into a Polaroid test camera. The key is the Polaroid OEM back. The
rear of the Lubitel camera is removed and back end filed down to enable
mounting the Polaroid back hardware. You want to be able to shim the back
to infinity, add a darkslide, and epoxy the entire Polaroid test camera
together. It is very helpful to securing precise infinity focus if the
lens cells can be loosened and resecured and tightened at the exact
infinity focusing point for the new camera plus Polaroid back combination.
Using this approach, you can make almost anything into a test
camera. For example, an old twin lens reflex can similarly be
converted. But old folders, especially with flash synched shutters, make
good conversion candidates too. One nice factor of these cameras is they
often have larger formats up to 6x9cm, making the Polaroid test prints
even easier to use.
The ideal source of leaf shutter lenses to match the circa 114mm focal
length of most fixed plastic Polaroid camera lenses (e.g., Polaroid
Swinger) lies in various leaf shutter lenses (e.g., 127mm) from older
folder cameras. Using this trick, you replace the fixed Polaroid lens with
a leaf shutter lens from an older folder which has a full range of f/stops
and shutter speeds (depending on the folder chosen, of course). Try to use
an x-synched folder or similar lens in this range, if you want easy use of
strobe synchronization.
The rest of the construction project is pretty simple too. You just remove
the Polaroid camera's lens and mount the shutter lens in its place. You
may need to epoxy in a lens mount (from the discarded folder) or simply
epoxy the lens directly in place. Naturally, you will want to check for
focus and shim the lens into the proper place for infinity focus. In some
cases, the lens can be slightly unscrewed from its mounting, and so
focused on somewhat closer objects. Again, this is easy to observe with a
piece of ground glass and a loupe at the film plane.
To keep the camera cheap, there isn't a rangefinder. Like the Nikonos
cameras, you have to "guesstimate" the distance to the most important
subject. You turn a large knob on the base of the camera to slide the
bellows to the desired distance. There is a viewfinder with frames for
both the 3 1/4" x 3 3/8" film and the 3 1/4" x 4 1/4" film packs. Yes,
that's right, this low end camera will take either type film packs, making
it unusually flexible in choice of films and film speeds.
Although this is a drop-down bed bellows camera, the amount of bellows
limits the close focusing ability of the setup to about 3 feet. You will
have to use closeup diopter lenses for
closeups, along with a wire frame guide. The model EE100S is reportedly
virtually identical to the Polaroid Reporter (which often sells for more).
Curiously, in an otherwise compact book sized camera when folded, the
viewfinder sticks up on top of the camera. The camera reportedly accepts
flashcubes for flash, but whether it will work with tricks reported in
postings below with X-synch strobes requires testing.
Given the features and capabilities of the EE100S camera, I find it
surprising that it sells for $10-20 US on EBAY. Being a bellows camera
with a 114mm lens very close to many folders, it should be relatively easy
to transplant an x-synched leaf shutter lens from an older folder to this
camera. Simply remove the old lens and shim the new lens in place and
epoxy away! A bit of experimentation will enable marking new distance
scales on the focusing knob base to go with the new remounted leaf shutter
lens.
Now you have the major advantage of access to both major film pack
sizes, with the various film types and potential economies that opens up.
The EE100S camera is compact when folded, unlike the fixed and bulky size
of many plastic pack cameras like the Polaroid Swinger series. Unlike
using Romney's method on one of those Swinger style plastic pack cameras,
this EE100S bellows camera leaves you with a compact easy to pack camera
between uses.
A poster (see below) has suggested that x-synch strobes may work well with
many Polaroid cameras directly, including models 250, 330, 350, and
440, at least under certain conditions. Certainly worth trying if you are
an experimenting type.
Unfortunately, many Polaroid backs and cameras may have a limited range of
film types and speeds available in that size and format. For example, the
Bronica S2A Polaroid back uses Polacolor type 108 (ASA 75) or black and
white positive/negative film packs of type 105 (ASA 75 - see type 655
positive/negative notes below). Black and white pictures are typically
shot with type 107 film packs (ASA 3000). The film is actually 8.5cm x
10.5cm in size, but only 5.6x5.6cm of that area is used for the image. So
you have one and only one color film choice and speed (75 ASA). Your black
and white film speed choices are either 75 ASA (type 105 p/n) or 3000 ASA
(type 107), with nothing inbetween. Naturally, if you use 3000 ASA film
for your test exposures, you will have to adjust or offset your exposures
onto ASA 400 print film. Failing to do so could result in unusable prints
and slides. Other Polaroid cameras may have a much broader choice of
films, and make direct use easier and perhaps more useful (e.g., Depth of
Field tests with matching ASA film speeds etc.).
One straightforward solution is to use neutral density filters of the
appropriate strength with standard film packs to convert these to provide
accurate exposure estimates for the actual rated film speed. Naturally,
you would have to offset these speeds if you have a personal exposure
index (EI) setting, but these are excellent starting points.
| Medium Format Film Options for Exposure Checking | ||
|---|---|---|
| 120 Film to Check | ISO | Instant Film + Neutral Density Filter to Use |
| Agfapan 25 | 25 | type 665 + ND0.9 |
| Panatomic X | 32 | type 665 + ND0.5 |
| Agfachrome 50S/50L, Ektachrome 50 Ilford Pan F | 50 | type 665 + ND0.1 or
ND0.2 Types 669, 88 + ND0.2 (Agfachrome 50S only) |
| Ektachrome 64 | 64 | type 665+ ND0.1 Types 669, 88 + ND0.1 |
| Agfachrome R100S, Ektachrome 100 Fujichrome 100, Agfacolor XR100, Fujicolor HR100 3M Color Print 100, Agfacolor N100S, Vericolor IIL, Agfapan 100 | 100 | type 665 +ND 0.1 (conventional films) Types 669, 88 for all but Agfacolor N100S or Vericolor IIL (with ND0.1 on conventional films) |
| Plus-X, Verichrome Pan, FP4 | 125 | type 665 + ND 0.2 (on conventional films) |
| Ektachrome 160, Vericolor IIIS | 160 | type 107C, 664, 107, 084, 87 + ND 1.3 |
| Ektachrome 200 | 200 | type 107C, 664, 107, 084, 87 + ND 1.2 |
|
Ektachrome 400, Fujicolor HR400 Tri-X, HP5, Agfapan 400 | 400 | type 107C, 664, 107, 084, 87 + ND 0.9 |
| Royal-X Pan | 1250 | type 107C, 664, 107, 084, 87 + ND 0.4 |
You may wonder why I bother to list 35mm only Polachrome slide options on
a site dedicated to medium format cameras? The short answer is that many
cameras have the capability to use 35mm film stocks, sometimes simply with
a film holder mechanism (e.g., Mamiya 7II) or modified film back (e.g.,
Bronicas). Other panoramic format cameras such as the Hasselblad Xpan or
Fuji variant use 35mm film for panoramic shots too. In fact, the ability
to use film emulsions not available in 120 rollfilm is a primary
reason for investing or making such film adapters.
One of the more interesting aspects of the Polachrome CS slides is that
they are basically a black and white film covered by a screen of ultra
thin stripes of red, green and blue filters. Each of these filter stripes
influences the development of the underlying B&W image density. Viewed
through the color filter, you get an additive color image. One side effect
is that highlights and the overall slide is darker when first processed
and viewed, since you are looking through a layer of screening filter
materials.
The key here is
that there is only one emulsion layer, rather than 3 or more as
with most conventional color films. This unique construction makes these
films simply wonderous for recording very long exposures and under
difficult mixed lighting regimes. Reciprocity
effects are limited to only one layer of black and white film, rather
than three layers with different color dyes. So you end up with a film
that is simply unique in its ability to handle very long exposures, such
as those details on our page on moonlight
landscapes. Cityscapes also benefit as you don't have to try
and filter out those awful green mercury vapor lights with magenta
filters which mess up the colors in the rest of your scene.
In addition to Polachrome CS, you have an "instant" black and white
slide film
option using Polapan CT, with processing times of under ten minutes. Be
aware that these films have unusual reflectivities, so off-the-film flash
exposure control systems will often be fooled into improper exposure. Use
manual procedures instead, or consult your flash manual and film papers.
While these instant slide films may be of some limited use for test camera
purposes, it has more potential as an unusual film stock. See The Film
Book by Roger Hicks and Frances Schultz for more on these unusual film
resources.
Costs for the processor are quite
reasonable, especially used. But the film stocks include both film costs
and processing materials, so costs are relatively high on a per roll or
per shot basis. And if you need the image right now, you obviously have to
use the roll to get it. In short, not a great substitute for a Polaroid
test camera, but the images are (relatively) permanent. If you need
instant test slides for some reason, this may be the solution you are
looking for.
Unfortunately, the support electronics of most current CCD and CMOS light
sensor chips are so large that you cannot easily position the chip surface
at the focal plane of the typical 35mm or medium format camera. A fused
fiber optic plate might work, but be costly, and still result in a setup
too thick to close the camera back (35mm or rangefinder in medium format
etc.). The actual size of most digital camera sensors is quite small, and
far too small to cover a typical medium format camera back image. You
either have to use multiple sensors, really expensive larger sensors of
high density, or use a moving or scanning line of sensors (similar to a
conventional scanner).
Obviously you have to use highly static or unmoving subjects (e.g.,
building, still lifes, product shots) unless blur is not a
problem for your application. One advantage is the ability to use higher
density black and white (really greyscale) images with a 256:1 range
(versus the typical 100:1 range on the better quality black and white
prints). Another advantage is the ability to link together or
"stitch" multiple images together into a panoramic photograph.
My guess is that many digital test cameras will provide such new options
as panoramic imagery and matching low cost color prints (e.g., Epson
14" paper). Once you have the digital camera and integral LCD
screen (or portable computer), using it as the equivalent of a
Polaroid test camera is a trivial application.
From: [email protected] (Tillamooky)
Newsgroups: rec.photo.equipment.medium-format
Date: 01 Sep 2000
Subject: Re: hacking test cameras.. Re: DIY Polaroid test camera
anybody?
Robert Monaghan told us:
>I'm not sure that would work simply because there is a startup delay in
>firing flash bulbs, often 20 msec or so, to reach full brightness, so the
>cameras setup for flashbulbs won't work with instantaneous x-synch strobes
>unless you either rework the shutter to provide no delay or build an
electronic delay circuit and fine tune it to work with an Xsynch strobe
see http://www.smu.edu/~rmonagha/mf/flashbulbs.html for notes of flashbulbs
I get good results simply by plugging the PC cord of either my Sunpack
383 or Promaster FTD 5600 flashes directly into the port on the side of
the lensboards of my folding pack film cameras (models 330, 440, 250, 350,
and a few others). I note that if I am photographing in somewhat dim
light, such as ISO 100@f 5.6@1/10 or darker, these Polaroid cameras will
hold their shutter open for a second or more _if_ I hold the shutter
button down, despite the flash discharge. I've created a PC cord from the
original cord of a model 268 bulb flash that was original to these cameras
but I found no difference in flash behavior. I once thought that the
extra prong on the Polaroid cord end switched the camera into a flash
circuit, and perhaps it does, but I can't tell any difference in
performance. Although I lay claim to the title "Polaroid Freakazoid" and
I have disassembled several Polaroid cameras, some to death, I don't
completely understand the details of their operations. Incidentally, these
folding pack film cameras _will_ hold their shutter open if you keep the
shutter button depressed _and_ the camera is in darkness or, my favorite
trick, something like black electrical tape or putty is placed over the
light sensor on the front of the camera. The result is kind of a "bulb'
setting which can be used for the same kind of effects that you would use
bulb setting on other cameras e.g. painting with light, multiple flash
pops, conversion of the lens to a pinhole, and probably some things I
can't think of just now...
Tillamooky,
the Polaroid Freakazoid
Date: Mon, 28 Aug 2000
From: [email protected] (Tan)
Newsgroups: rec.photo.equipment.medium-format
Subject: DIY Polaroid test camera anybody?
I need a lightweight Polaroid test camera to do the occasional lighting
test when shooting 35mm. I can't bring myself to either buy an NPC Pro
back for the 35mm camera and another body, or a converted 110 (too big and
pricey), or lug my RZ out just to take Polaroids.
Just the other day, I came across a Roger Hicks book on lighting and there
was a nice picture of a self-hacked Lubitel/Polaroid test camera. This got
me really intrigued. (and I remembered seeing a Mamiya 330F Polaroid hack
at Steve Gandy's site as well http://www.cameraquest.com/m330pol.htm)
Alas, locally, Lubitels are no longer cheap. But a new Seagull TLR 6x6
with a very decent triplet lens is selling for $55. A new Polaroid 405
back, another $55. ;-)
Question is, has anyone in this NG built one before? Hicks suggested that
a perfect film plane alignment was unnecessary (didn't say why, but I can
imagine that that's because the picture is going to be real small and a
throwaway one at that).
I am soliciting tips for this DIY project.
In particular, since this a TLR, how should I begin to adjust the
focussing to compensate for the slightly recessed Polaroid back? I can't
quite figure out how to adjust the focussing - do I play with the mirror
or the focussing screen or both?
Appreciate any tips.
Regards,
K H Tan
STUDIO Q
http://StudioQ.com
Date: 29 Aug 2000
From: [email protected] (Robert Monaghan)
Newsgroups: rec.photo.equipment.medium-format
Subject: hacking test cameras.. Re: DIY Polaroid test camera anybody?
try Hicks original article in Shutterbug Aug 1997 p.38 etc.
IIRC correctly, you just grind down the camera (back removed) and epoxy
the $30 US OEM polaroid film pack (from any polaroid dealer) into place,
eat pizza, celebrate new test camera...
personally, I prefer Ed Romney's suggestion, find a garage sale polaroid
that takes the kind of film you like, and adapt a (flash synched) lens
from bad bellows folder to it with epoxy and shim if needed - the typical
polaroid lens is circa 105mm and so close to many of the older folder
lenses. The folders also have good coverage, and you get leaf shutter too
I'd be interested in any other polaroid test camera hacks out there too
;-) grins bobm
From Bronica Mailing List:
Date: Thu, 31 Aug 2000
From: [email protected]
Subject: Re: re: Ruth email and S2 polaroid backs
Bob,
There is such a shortage of Polaroid backs for Bronica S2- and S-2A -
it would be good if one could be built for under $100, by Ken Ruth or
otherwise.
I have and use a good Bronica Polaroid back for S-2/S-2A and have used it
successfully for many years. It is a great tool.
These backs now sell upwards of $200 to $350.
It should not be too tough to - buy a stock Polaroid back for $40 and make
a template to fit it.
This could come from a junker rollfilm back - or someone could remove a
plate from a working back - take it to a machine shop and machine up a
quantity of adapter plates for Polaroid backs.
Then the only question would be where thw screws would attach it and any
shimming needed to set true infinity focus.
This is a worthwhile project.
- Sam
>From: Robert Monaghan [email protected]
>To: [email protected]
>Subject: [Bronica] re: Ruth email and S2 polaroid backs
>Date: Wed, Aug 30, 2000, 11:10 PM
>

>
>try [email protected]  for ken ruth at bald mountain; that said, I
>doubt you could get a custom polaroid back made for much less than cost
>of used ones on EBAY etc. given they need to make a mounting plate etc.
>or cannabalize an old back, however the film holders for polaroid OEM are
>cheap at $30-40 US and you can probably make a serviceable polaroid back
>with a metal mounting bracket from an older camera back, some machining
>or perhaps just epoxy and be within your $100 budget? For most of us, it
>is easier to adapt or build a polaroid test camera, such as the article
>by Roger Hicks in Aug 1997 Shutterbug (p.38) using a lubitel and $30 OEM
>polaroid back plus epoxy and a file to make it into a polaroid test camera
Date: 03 Sep 2000
From: [email protected] (Tillamooky)
Newsgroups: rec.photo.equipment.medium-format
Subject: Re: hacking test cameras.. Re: DIY Polaroid test camera anybody?
Robert Monaghan told us:
>I am interested in doing some low cost panoramic cameras, and a low cost
>wide coverage small size lens would be quite handy if it has coverage,
>hence part of my interest - see nimslo conversion notes at
>http://www.smu.edu/~rmonagha/mf/nimslo.html
Interesting that you should mention this. Last year I played around with
removing the lensboard from a Polaroid folding pack film camera, can't
remember which model, and constructed a makeshift lensboard out of black
matte board. I made the matte lensboard to fit my 4x5 Speed Graphic.
With the Polaroid lens/shutter attached to the matte board lensboard I did
a few test shots, got good coverage on some Type 59 film that I loaded
into the model 545 instant film back for my Speed Graph'. They were also
quite decently sharp, despite the fact that I had used one of the plastic
lensed Polaroid. Don't knock those plastic Polaroid lenses. During WWII
Polaroid Corp. lens engineers became experts at creating plastic lenses of
very high quality for use in various sighting apparatus for military
weapons.
Tillamooky
The, yes THE, Polaroid Freakazoid
Date: 03 Sep 2000
From: [email protected] (Tillamooky)
Newsgroups: rec.photo.equipment.medium-format
Subject: Re: hacking test cameras.. Re: DIY Polaroid test camera anybody?
K.H. Tan told us:
>Someone in Photo.net suggested a Polaroid 220 for exactly what you're
>suggesting
>Bob.
>
>Knowing nothing about these old cameras and not being able to find any info
>about film, can anyone tell me if it takes 669 film?
As best as I can recall, no has so far suggested the following website
http://www.rwhirled.com/landlist/landhome.htm
This is known as the Land List and it is a remarkable wealth of
information on Polaroid cameras and it should provide you with info on the
model 220. Here are a few mor URL's that may be of interest:
http://www.fourdesigns.com/ This is the website of Four Designs
Company, a
specialist in Polaroid cameras and accessories.
http://www.box818.com/index.html This is the website of Graphic Center,
another company that specializes in Polaroid cameras and accessories.
Tillamooky
aka The Polaroid Freakazoid!
Date: Thu, 07 Sep 2000
From: JW [email protected]
Newsgroups: rec.photo.equipment.medium-format
Subject: Polaroid hack
Polaroid Cameras made for Tektronix 7000 series oscilloscopes are easy
to hack and dirt cheap on Ebay - from $15 to $35.
On the two I have, a C53 and a C59, max shutter speed is 1/60th/. You
will have to monkey with the lens and use a sports type finder,
however! There are enough options for electronic control/synch for
anyone who has a modicum of electronic skills.
TEK stuff is wonderfully built too.
From Rollei Mailing List:
Date: Sat, 9 Sep 2000
From: [email protected]
Subject: Re: [Rollei] rollei TLR and polaroid
>From  JF Harrison :
> Is there a convenient way to take polaroids with a TLR and cut-film back?
> How about an inconvenient way? ;)
I think the main problem to adapt a polaroid back on R-TLR is that it
might be difficult to bring the polaroid film plane on the film gate.
Historically if you read the good authors (e.g. Prochnow) there was a
device named "ROLLEICOPI", apparently a modified Rolleicord designed
to take polaroid images from an oscilloscope. BUT the object was very
close to the lens (a "small" CRT display), so the image plane was
moved backwards by a few mm, thus allowing a "regular" polaroid back
to be fitted. Incidentally in the Rolleicopi the view-finder was
modified accordingly to increase the lens-to-ground glass distance.
(easy).
So a first idea would be to start from a R-TLR sheet film adapter
(very affordable on the used equipment market) and put with a
home-made mechanical attachment a standard view camera polaroid back
on it. Then when the R-TLR taking lens is focussed "on infinity",
you'll be able to get in focus objects located at, say 1 or 2 feet,
like in the Rolleicopi. So to correct this you'll need a *negative
element* "close-up" lens to add in front, like if the poor Rolleiflex
was very short-sighted (like me). To do this simply get a negative
lens from an opticist or from any supplier or optical components and
re-mount it in an empty filter mount. The exact value of the focal
length can be easily computed from the actual focal length of the
R-TLR (75 or 80mm) and the value of the offset between the R-TLR film
gate and the actual polaroid film plane. Of course do not expect top
quality images, but for a polaroid test image, who cares ? So it is
easy in theory. And in practice you'll just have to swap the
"close-up" lens from viewing lens to taking lens. Cannibalizing a real
R-TLR close-up twin-lens set (with the built-in prism on the taking
lens) would probably be optically correct, but not worth the time and
money and definitely not "RUG-politically-correct" ;-) ;-)
The other idea would be to try and use R-TLR sheet film holders
designed for conventional 6.5x9cm sheet film, which are cleverly
designed to bring the film a the right place by moving/gliding a
lever. But then you'll have to cut polaroid films individually which
seems really impossible without opening/destroying the caustic
processing gel bag, much bigger than the R-TLR cut-film holder can
accommodate. An even so you'll have to press it between the rollers
for processing which is a real challenge. But if you are challenged by
"inconvenient" solutions... ;-)
Hope these theoretical considerations are helpful,
--
Emmanuel BIGLER
[email protected]
From Rollei Mailing List:
Date: Sat, 9 Sep 2000
From: [email protected]
Subject: Re: [Rollei] rollei TLR and polaroid, negative lens (erratum)
About trying to put a polaroid film back on a R-TLR.
Addendum/erratum about the use of a negative "close up" lens on the
taking lens when a polaroid film is to be located with an offset,
backwards : there is in fact *no need* to swap this lens on the
viewing lens for focusing at infinity, except if you offset the
ground glass by the same amount. But then another problem arises.
If this additional element is properly chosen, both lenses will "see"
sharp at infinity. However when changing the focusing knob to get
closer objects sharp, both lenses will no longer be in focus together,
since the symmetry between both optical systems has been broken (you
have in fact changed the focal length of the taking lens by adding an
element in front). So you end up with a solution which is in fact :
modify your R-TLR to a ROLLEICOPI configuration (offset of film plane,
*exactly* same offset of ground glass plane), and add a negative
close-up lens to be swapped from viewing lens to taking lens like for
an ordinary close-up situation. The whole thing becomes more complex
since it involves to re-design and adapt an extra spacer underneath
the original ground glass, but this is not an impossible task for
somebody who has already succeeded in fitting a view camera or 6x6 SLR
polaroid back on R-TLR cut film back. The other solution would be to
try and find a ROLLEICOPI on the second hand market. Good luck then
;-);-)
--
Emmanuel BIGLER
[email protected]
rec.photo.equipment.medium-format
Date: Fri Oct 06 17:33:14 CDT 2000
From: [email protected] (PeterH2072)
[1] Re: Polaroid sharpness?
Your image on Polapan PRO 100 is indeed unsharp. I've had a similar
problem with various Polaroid microscope adaptors and traced the problem
to improper film plane location. For some reason Polaroid adaptor backs
aren't all spaced properly [film to seating plane]. One way to ascertain
this is to photograph a canted yardstick ... focusing in the middle, then
determining if the nearer or further parts of the stick are in better
focus. Shimming the holder may be a LOT easier than shaving off material
if the film needs to be closer to the lens. We have done this using a
mill to remove 1/2 mm of material on one particularly bad holder. Once
corrected, the images were needle sharp.
Peter
Peter A. Hochstein
From camera makers mailing list:
Date: Wed, 14 Aug 2002
From: Marv Soloff [email protected]
Subject: Re: [Cameramakers] Polaroid back for 2x3

Matt M wrote:
>
> I have been playing with my Century Graphic 2x3 for a little while
> while following this list and have a question that some of the
> engineers here may be able to answer for me.
>
> Coming from a commercial background, I tend to rely heavily on
> polaroid for previewing a shot. Neither polaroid or NPC have a back
> for the camera, however, npc has offered to build one. I am still
> waiting on a price, but I think it will be outside of what I am
> willing to part with.
>
> I have part of one (the box and the rollers) and just need to build
> an extension to make it attach to the camera. The tricky part will be
> getting the film plane in the right area. NPC and Polaroid use
> coherant fiber optic bundles to "pipe" the image from the camera's
> film plane to the surface of the polaroid. It looks like I will need
> a bundle that is 6x9cm by 15mm thick.
>
> Now my questions:
> Has anyone here had any experience making a polaroid back?
> Does anyone know where I can get the coherant fiber optic bundle?
>
> Thanks for any help!
>
> Sincerely,
>
> Matt McKee

I have modified many Polaroid Colorpack cameras for use with Graphic
type cameras.  Essentially, you slice away the camera (plastic) and
fabricate a plate/holding device to allow mounting the resulting
Polaroid film chamber to the camera.  Easier than it sounds, and very
cheap as the Colorpacks are going for about one dollar at flea markets
and garage sales.

Regards,

Marv